Showing posts with label PC Tricks. Show all posts

Monday, 25 November 2013

Bye Bye !!


Bye Bye !!


This Blog Going To be Closed Soon ...

No Any Latest Updates Will Post Here ...

If You Want Our Latest Updates Go To The Link Below ...


bye bye

Thanks

&

Regards,

RAMZAN BALOCH

Sunday, 7 April 2013

How To Install Windows XP With USB Drive

This tutorial will explain how to install windows xp with usb drive.
Screenshots provided to make make bootable usb and copy windows xp installer.


How To Install Windows XP With USB Drive


If you are thinking to install xp from usb boot. Then you are at right place. 
I’ll show step by step how to boot windows xp from usb. Installing windows xp with usb is very simple. All screenshots are given to show you how to install windows xp. 
You’ll only need windows XP iso aur windows XP CD. 
Secondly a usb drive of atleast 1 GB is required for windows xp on usb.

How To install Windows XP From USB 

’ll need WinToFlash tool to make bootable USB and install windows xp from usb.


Easy Steps to Install Windows XP With USB Drive

Open WinToFlash software this will help you to install windows XP.

 
Once the software is opened Follow below screenshot. If you have windows XP ISO 
then mount image to Virtual drive using ultraISO. If ultraiso is not installed then you 
can download ultraiso from here. Otherwise if you have Windows XP CD then insert into 
your CD rom.
 
The WinToFlash supports both CD and ISO File to be read as disk image and copy that to drive letter. The procedure is mentioned in below screenshot.
 
For example in my case Drive E contains Windows XP ISO image mounted. whereas F 
drive is my usb. Then Click Next button and your USB pen drive will be formatted. This 
tool will make usb bootable and will install windows XP on usb drive. Once the 
process is 100% then you can reboot computer and boot XP from USB.If you hit any errors during installation of XP via USB then please comment here. 
This tool also supports installation of Windows 8 and Windows 7. However you can also find complete tutorial to  Windows 7 from USB.

Download Youtube Videos with IDM Using Proxy

If youtube is blocked in any country then you can still download youtube videos. In this tutorial I’ll share the steps to download youtube videos.


Download Youtube Videos with IDM Using Proxy


How to Download Youtube Videos

Now when Youtube is blocked in some countries. People often use proxy tools (Ultrasurf, Hotspot sheild or hide ip). Then many people are facing issues while download from youtube by IDM. Because IDM needs to be configured to download youtube videos when on proxy.

Youtube Downloader Steps
if you haven’t install IDM then first you need to install it. You can download IDM from this link.
If you are not already using any proxy then I suggest you to Install Ultrasurf.
Make sure IDM is registered. You can follow steps in read me document of its folder.
Run Ultrasurf and wait until it is connected.
Open IDM and go to Option button.

Click the “Proxy/Socks” Tab and hit button “Get From IE”


Then press OK and Close the options.
Now Open Youtube in browser.
You’ll see IDM link on corner of youtube video. 
Click it and youtube video downloading will begin successfully.
If you hit any issues while downloading video from youtube let me know.


Wednesday, 13 March 2013

Windows 7 USB Installation

This tutorial is about Windows 7 USB Installation. Below are steps with screenshot. No CD is required. All you need is a usb flash drive of atleast 4GB and Windows 7 iso file.


Windows 7 USB Installation


Windows 7 USB Installation


First of all Download this program. This is Microsoft genuine tool to make usb drive bootable


After you have downloaded above Windows 7 USB tool. Now follow below steps.
Open this tool from your programs.


Windows 7 USB Installation


Then Click on Browse button and go to path where your windows iso file is located.


Windows 7 USB Installation


Click on WIndows 7 iso file and click on Open button.


Windows 7 USB Installation


Now from options click on USB Device.


Windows 7 USB Installation


From Drop Down box select your USB Pen drive letter e.g. H: or I: or G: and then click Begin copying. After the process is completed the USB is now bootable.
Turn off your computer and plugin USB. Now Turn on PC and boot from USB. Done.


Thursday, 7 March 2013

How To Make Bootable USB Through CMD


Having a bootable USB is very essential, especially if you are a Netbook user. Using bootable USB to install an operating system (OS) not only makes the installation faster, but also saves a DVD.
Creating or using an USB drive to install Windows operating systems is very easy if you follow the below mentioned steps:

Note that this bootable USB guide will not work if you are trying to make a bootable USB on XP computer.

Coming back to bootable USB guide, here we assume that you are using either Vista or Windows 7 to create a bootable USB.
1. Insert your USB (4GB+ preferable) stick to the system and backup all the data from the USB as we are going to format the USB to make it as bootable.
2. Open elevated Command Prompt. To do this, type in CMD in Start menu search field and hitCtrl + Shift + Enter. Alternatively, navigate to Start > All programs >Accessories > right click on Command Prompt and select run as administrator.
3. When the Command Prompt opens, enter the following command:
DISKPART and hit enter.
LIST DISK and hit enter.
Once you enter the LIST DISK command, it will show the disk number of your USB drive. In the below image my USB drive disk no is Disk 2.
4. In this step you need to enter all the below commands one by one and hit enter. As these commands are self explanatory, you can easily guess what these commands do.
SELECT DISK 2
CLEAN
CREATE PARTITION PRIMARY
SELECT PARTITION
ACTIVE
FORMAT FS=NTFS
(Format process may take few seconds)
ASSIGN
EXIT


Don’t close the command prompt as we need to execute one more command at the next step. Just minimize it.
5. Insert your Windows DVD in the optical drive and note down the drive letter of the optical drive and USB media. Here I use “J” as my optical (DVD) drive letter and “M” as my USB drive letter.
6. Go back to command prompt and execute the following commands:
J:CD BOOT and hit enter. Where “J” is your DVD drive letter.
CD BOOT and hit enter to see the below message.
BOOTSECT.EXE/NT60 M:
(Where “M” is your USB drive letter)


7. Copy Windows DVD contents to USB.
You are done with your bootable USB. You can now use this bootable USB as bootable DVD on any computer that comes with USB boot feature (most of the current motherboards support this feature).

Note: If you are not able to boot after following this guide means you haven’t set the BIOS priority to USB. If you got any problem in following this guide feel free to ask questions by leaving comment.


How to Make an Application Portable


Ever wanted to use your programs on the go? Not want to install your favorite programs on other computers. Try this little moderately simple trick to use your favorite programs easily from your flash drive, mp3 player, or external hard drive.

Instructions 

1. The first thing you are going to need to do is download two programs, Universal Extractor and WinRar. To download the Universal Extractor Goto These Links
For Winrar: Click Here To Download!!!
For Universal Extractor: Click Here To Download!!!

2. After your program is downloaded Installed Both of The Program.
After installing goto to setup file of the application that you want to make Portable and right-click on the setup file. If you have properly installed Universal Extractor Click On uniextract to subdir. A command prompt will open and it will automatically extract to a folder, on your desktop or wherever you want to save it.

 3. Open the folder, and search for the folder which contains the executable file that opens the application(you can test it to make sure it works properly). Highlight all of the files needed for the program in that folder. Right-click, and click on add to archive.

4.  Change the archive name to whatever you want, such as: Audacity Portable. Click on create SFX archive. Choose "best" under the category "Compression Method".

5.   Go to the advanced tab. Click on SFX options. When the options window comes up, type the name of the executable (Audacity.exe) in "Run After Extraction" in the SetUp Program category. In the Modes tab, click on unpack to temporary folder and Also check on the hide all. In the Update tab, click on "Overwrite All Files".

6.  Click OK to exit both windows. If all has gone correctly, it should create a single executable file that you can copy to your flash drive, mp3 player, or external hard drive and use from any computer you choose.

Convert Windows XP SP2 into SP3 without any setup program: Simple trick


These days the technology is changing very rapidly and with in a short span of time we have to update with the new patches ans supplement for several software, though these are always in the favor of the end user but most of the time we just don’t want to implement these latest changes. Like me, I wanted to install Microsoft Visual studio 2010, which requires windows SP3 installed to run it but I just don’t want to do so. So should i left it or there are any alternatives… Yes I have found one… And it is described below:

As for most of the programs they usually look into the info about the system status into the registry file to locate the software and patches which decides their performance. So here is the trick to fool such programs which requires Windows XP SP3 patch by altering the Windows XP SP2 version info. To do so go to windows run command (Using windows key +R) and then, typeregedit to open Registry Editor And Click on the HKEY_LOCAL_MACHINE.


So now you have registry editor opened then only browse to the following key:

Now follow These steps to goto the KEY
HKEY_LOCAL_MACHINE\SYSTEM\ CurrentControlSet\ Control\ Windows


System>CurrentControlSet>Control


Control>Windows


Double Click on the CSDVersion that is on the Right side
and modify “CSDVersion” from “0×00000200” (SP2) to the Windows XP SP3 value of “0×00000300” and reboot


Change the Value From 200 To 300 And Reboot To see the changes


Use your USB flash drive as virtual RAM


Today I´m gonna show you how to use a USB thumb drive as a virtual RAM device for your PC.
The thumb drive I'm using is a 4 GB from Kingston. The size should be less than 4 GB.
Follow the screenshots below to go through theSteps.

Step 1:
Rename your thumb drive  as "RAM DRIVE", so you can see that it is the one which is used as RAM.

Step 2:
Delete all the stuff one the pen drive. Look also after hidden once.


Step 3:
Right click on "My Computer" --> Properties

Step 4:
click on "Advanced Tab" -->"Settings" (under performance)


Step 5:
click on "Advanced" -->  "Change"


Step 6:
Click on your thumb drive above  --> "Custom Size"  -->
you can see the size of your flash drive (in this case 3844Mb)
calculate: size of flash drive - 5 Mb
in this case: 3844- 5 = 3839
Now type this size in the first box and also In the second box type the same Size (see picture) -->
Click "Set" and "OK"


Step 7:
Click "Apply", click not "Cancel" or  "OK".
After you have clicked "Apply", click "OK".
Restart your computer.


Warning:
Don´t pull out your thumb drive after you made these changes, because it´s being used as virtual RAM device. It may crash your computer if you pull out your thumb drive. Do it on your own Risk

If your computer didn´t get really faster or you have other reasons to remove the USB thumb drive than take the following steps:
Go to step 6 and choose your USB thumb drive, than click "no paging file" --> "Set" -->"OK" --> "Apply"


Done... :))


How to Change Windows 7 Logon Screen


There are many ways through which you can change Windows 7 Logon screen and insert your own picture or wallpaper of your choice. One of the best free software to change windows 7 Logon screen is Stardocks Logon Studio. This program is also available for Windows XP and you can download both software from the link given at the end of this post. But if you are bit like me who don’t use software’s for every purpose than today i am going to share a registry hack trick through which you can easily change Windows 7 Logon Screen and get rid of old and boring Windows 7 Logon screen.

1. First click on Start button and then click on Search field and enter word REGEDIT in it.

2. REGEDIT icon should appear on top of start menu. Right-click on REGEDIT and select “Run As Administrator“.

3. After that windows will ask for permission. Just lick Yes button and Windows Registry Editor should open.

4. Now you have to browse the following key in order to change some registryentries.
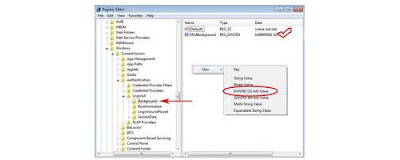
HKEY_LOCAL_MACHINE / Software / Microsoft / Windows / CurrentVersion / Authentication / LogonUI / Background

5. Now select Background folder from the left Pane by just clicking once on it.

6. After that Right-Click on right side of the Registry Editor and select DWORD (32-bit) value from the popup menu.

7. Right click on newly created entry and select Rename. Enter word OEMBackground and click OK button.

8. Again double-click on this entry and set its value to 1.

9. Now Close the Registry Editor, open My Computer and browse the following folder.
C: / Windows / System32 / oobe / info / backgrounds

10. Copy paste the image or wallpaper you want to show on Logon in this folder and rename it background Default.

11. Reboot and enjoy the New Logon.


Download: StarDock Logon Studio for Windows 7


Download: StarDock Logon Studio for Windows XP


Change Windows 7 System Properties Logo


Ever wanted to change the default windows logo in windows 7 system properties with your own custom one or with Apple’s logo. Its human nature that with time he tends to get bore with old things and same is happen with Windows users. Every day you see same windows interface with same folder icons, Windows themes, Wallpapers and default windows icons. But not many people think like that. They produce small utilizes for us so that we can customize the windowswith time to time. This will surely produce interest in windows and hence you can enjoy our work.

When you press windows logo + pause/break button, you will see Windows system properties box with all the information and default orb style logo. The way we are going to change the default orb style logo with our custom one is by using a small utility named as Windows 7 System Properties Logo Changer. This is a free utility and it changes the windows 7 properties logo with the help of some registry tweak. This software is fully test and used by us so don’t worry if you have any concerns.


Change Windows 7 System Properties Logo


How to Change Windows 7 System Properties Logo:

1. All you have to do is to download Windows 7 System Properties Logo Changer from the link given at the end of this post.

2. The file is in Zip format so you need Winzip in order to extract it.

3. After unzipping Right click on the Execute-able file and select “Run as Administrator” from the menu.

4. Now create your own logo or choose from a pre-build logos and click Apply button.

5. After that click the Check button or press windows logo + pause/break button to see the effect.

6. Don’t worry if you dont like the new logo you can always go back to the original log by pressing the Restore button.


Download: Windows 7 System Properties Logo Changer


Enable Desktop Wallpapers and Themes in Windows 7 Starter and Home Basic

windows 7 starter screenshot of GUI Personalization Panel


It amazing that you can change wallpaper in Windows 3.1(First ever edition of windows) but not inWindows 7 Starter and Windows 7 Home Basic editions. Microsoft says that they have disable these features in order to make these versions perform better and require less resources. But i am afraid that this is not 20th century when computers were very slow and you have to save every bit of it in order to run it smoothly. Now computer processors have dual cores in it, more cache and with faster graphics it in very surprising that Microsoft has said this. But good news is that you can enable Desktop wallpapers in Windows 7 Starter and Windows 7 Home Basic very easily with the help of a tiny utility called GUI Personalization Panel.

Personalization Panel is a Free software which allows you to first enable desktop wallpapers in windows 7 starter and Home basic and than change from variety of wallpapers or choose you own wallpaper. But this is not enough, this utility also enables windows Aero themes so that you can change theme which you like most and change the color of theme too. Other features include changing desktop icons, Mouse cursors, screen savers and windows sounds as well.
How can i change Desktop wallpaper and Windows Theme color:
1. Download GUI Personalization Panel from the link given at the end of this post, Unzip it and install it with administrator rights.
2. Once installed open it via start menu list and it will ask for permission.
3. Click Yes to give the permission and main interface will open.
4. Now click on Desktop Background link and a new dialog box will appear.
5. Click Browse button and select the wallpaper you want to display.
6. Click OK button and your new wallpaper will be displayed.
7. Also you can change Windows themes color by clicking on Windows Color link and then choose from the variety of colors.


Download: GUI Personalization Panel


Force Windows to Shutdown in Less than 10 Seconds


When you first install windows on your computer you notice that windows boot and shutdown in less than 10 seconds. But after some time and after installing different software’s and antiviruses it began to slow down and some time it takes more than a minute to boot or shut down. What happens that when you install software’s they make changes into your windows registry like load software’s at boot time etc. Same is the case with windows shutdown, Windows always wait for running programs to kill themselves for specific time. This approach can take your computer shutdown time to go over one minute which is of course very annoying. But today i am going to tell you a very unique computer tips and tricks and with the help of some registry commands you can force windows to shutdown in less than 10 seconds.

How to make Windows Shutdown Faster:
1. First click on windows Start button and than type RegEdit in Run command box.
2. Now find this registry key. HKEY_CURRENT_USER/Control Panel/Desktop
3. When you find the key, simply Right click on right side of the Editor and select New String Value.
4. Rename the new key value to HungAppTimeOut and hit enter.
5. Double click on newly created key entry and enter 1000 which is equal to 10 seconds.
6. Close the Registry Editor and reboot your system to check the new faster shutdown.

Send and Receive Large Files By Creating A Free Direct Connection Link


There are lots of ways on internet to share files with your friends, family and even the rest of world. In these typical methods you have to first upload the file on some kind of server line RapidShare.com,Megaupload.com etc and then share uploaded file link with other in order to download the file. But the big problem with this method is that almost all file sharing websites have some sort of file size restrictions typically 200MB which is of-course now a days with high bandwidth and fastest internet speeds look very small file size. Another problem is download speed, specially if you are a Free member on these sites. Because of sever load on file sharing website servers you get very little download speed which means more time wasting.

One of the many other restriction apply by the Free File sharing websites is that they do not allow you to download files instantly which means that you have to wait between two downloads. If you have download a file and want to download another file you have to wait about 60 to 90 seconds. Also you cannot downloadmultiple files from these websites which is also very annoying. So if you want to remove all these restrictions you have to buy premium membership on these file sharing websites. But hold on there is another FREE way through which you can send and receive files.ClicktoCopy.com is a website which has taken this initiative to remove all these restriction so that everyone on internet share fileseasily and with out wasting any time.


click2copy Send and Receive Large Files


ClicktoCopy.com is a free file sharing website but its very unique and easy to use. First you don’t have to upload files onto server in order to share it with others. So your precious time and money saved. Secondly you can share unlimited amount of files with unlimited size which is awesome for Free users like us. The file sharing process is very simple, Just visit ClicktoCopy.com, from your browser click send a file and it will open windows dialog box. Choose which file you want to share with your friends and click open button and you are done. Just send file share link which will appear on next screen and send it to your friends in order to download. When they click on that link file start to download instantly with full speed according to your internet connection speed.
ClicktoCopy Features:
1. No File Size Restriction.
2. No software installation.
3. Send and Receive Unlimited Files.
4. Send and Receive files in just one Click.
5. No waiting Time.
6. Download multiple files at the same time.
7. And the best part is that its 100% FREE.

How to Get Free Skype Credit

Skype the number one software to make voice calls on internet is rapidly growing its customers all over the world and the major reason to using this service that it allows you to make calls from computer to computer absolutely free of cost. Which means that you can make calls to your friends and family members any where in the world without having to buy any extra equipment or credit. ButSkype is also offering its customers a paid service through which you can call to any mobile or land-line number any where in the world from your computer. All you have to do is to buy credit from Skype, install the software and you are ready to go. There is also a computer trick through which you can get free credit of 2 dollars.

how to get skype credit free


1. Download the software.

First you have to download the Skype software from this link and just click on blueDownload Skype button in order to start the download process. If you are already a member on this site than you have to login other wise create your Skype account here. After registration it will download the installer on to your hard drive.
Double click on the mini installer in order to download and install the actual software. This will take some time so please be patient. After successfulinstallation close the application and now we will move to the next step.

2. Change you IP address.

Free Skype Credit offer is only for united kingdom visitors only so if you are not from United Kingdom of Great Britain than you have to use any IP changer software in order to change the IP address of your computer. For those who are not familiar with this word “IP address” let me tell you that all the computers on internet are recognized by there IP addresses so if your IP address is from Pakistan’s IP range than any body can see that you are from Pakistan but if you install a IP changer software than you can also change your IP to any countries IP and hence you change your country.
For this you have to install IP Switcher software from Cnet website. After download install the software and change your IP to United Kingdom IP address so that you can benefit from the promotion. Make sure that that your IP is change by visiting the website Ip-adress.com and see what it shows.

3. Like Facebook page and get Credit.

Ifeelgoods is giving away 2 US dollars Skype credit to every Facebook fan who like there page. So in order to get the free credit you have to like Ifeelgoods Facebook page from here. After that you will see a new dialog box just click on “Skype” and you will get your code. Now login into your Skype account via the software you install before and click on buy credit links. Simply enter the code and you will instantly earn 2 dollars credit through which you can call to any mobile or land-line number any where around the world.

Speedup Youtube Videos Buffering 3 Times Faster

We all love YouTube as it gives us the power to learn, listen our favorite music and some times pass time by watching funny videos. YouTube is the world’s no.1 online videos sharing website with over million new videos uploaded daily. Thisnumber tell us that how much influence YouTube has over internet users and if someone cannot have access or very limited access due to the slow internet connection than its very disappointed. But there are certain ways through which you can really improve the buffering speed of YouTube videos so that you can enjoy watching videos on slow connections too. Infect by doing these windowstricks i was able to improve my videos buffering speed up-to 3 times faster.

youtube logo

1. Speed up your Internet connection.

Not many people know that they increase the internet connection speed up-to 20% which will definitely increase the loading of YouTube videos. You may be wondering how this is possible. The answer is very simple, Microsoft windows kept or steals 20% bandwidth of your internet connection to there activities like Update, Sending error reports etc. So if we change some registry values in our windows than we can bring back this speed so that we enjoy 100% of our internet speed.
Click on start button ans than select RUN. Type “gpedit.msc” in Run box.
Select Local Computer Policy >> Computer Configuration >> Administrative Templates >> Network >>Qos Packet Scheduler >> Limit Reservable Bandwidth.
Double click on limit Reservable Bandwidth and then select enable and edit the bandwidth to Zero.
You will not find “gpedit.msc” in Windows 7 Starter and Basic by default so you have to first download the installer from here. Install it and now you will be able to find this in windows.

2. Enable YouTube Feather.

Some time ago YouTube launched YouTube Feather beta for its users with low internet bandwidth so that they can enjoy faster page loading speeds. For this to activate you have to first login into your YouTube account and than visit YouTube Feather Beta page. Click on Join the Feather beta link at the bottom of the page and start searching videos. You will see a clear difference in page loading.
But Feather Beta has also some limitations like you cannot see or post comments. You cannot like or Dislike the video which means that you can only watch the video. Also YouTube will only suggest you 5 videos related to the one you are watching.

3. Use YouTube DNS.

By default our computer’s network card settings are set to Obtain DNS Server Address Automatically which in many cases is good but when it comes to YouTube buffering its better to use YouTube DNS in order to speed up your buffering. Open your Network card DNS settings page via Networking menu in Control Panel and set these values.
208.67.222.222
208.67.220.220

4. Install SpeedBit Video Accelerator.

Unfortunately only doing above mention steps or not enough if you want ground braking results. Install SpeedBit Video Accelerator which is a free software. Install it and after that it will automatically do its magic and you can enjoy watching HD videos with out any delays. Not only is increases the buffering speed but you can also save videos from more than 115 videos haring websites with just 1 click of a button.